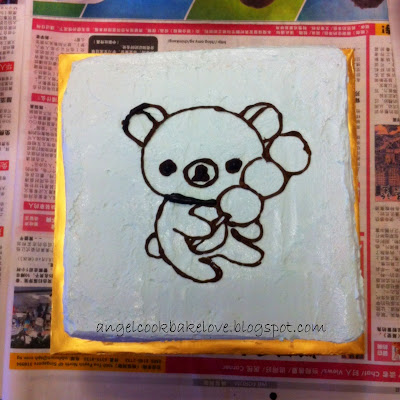
This week we are making picture cake. We were told to cream and freeze the cake at home. Why the cake needs to be frozen? You will find out later.
I have spent quite some times thinking and finding the picture I wanted to do. Unfortunately, the blur me forgot to bring the picture to class! (Disaster, isn’t that?) Luckily, a very nice classmate of mine brought extra pictures and I managed to pick a picture I liked.
What you need?
- A basic sponge cake (any shape) (Richard suggested not smaller than 8”)
- Turntable
- Knife
- Flat spatula
- Whipping cream
- Piping bag or make from scratch using tracing paper
- Piping jelly
- Food colour
- Cooking chocolate aka compound chocolate
- Picture (make sure it is smaller than the size of cake)
- Tracing paper
- Trace picture outline with melted chocolate and transfer it on cake
- Use of piping jelly
How to draw picture on cake?
- Cream the whole cake with whipping cream. If you want to decorate the side or coat the side you can do it now but do not pipe anything on the top border. Freeze the cake.
- Place a tracing paper (cannot use parcement or greaseproof paper) on the picture and trace the outline of the picture using pencil/ pen.
- Place cooking chocolate (cannot use converture) in a bowl (make sure the bowl is dry) and melt over simmering water. Stir from time to time.
- Add little melted chocolate in piping bag and cut a small hole. The best temperature of melted chocolate for piping is 40C. You only need very little melted chocolate, balance melted chocolate can be kept in fridge. Thaw overnight in room temperature if you need to melt it again. As advised by Richard, you can’t melt the chocolate directly from fridge.
- Pipe melted chocolate on the outline of the picture. You may pipe on the opposite side of the tracing paper (i.e. mirror image so when you flip over the image will be the right side). When piping, do not drag the melted chocolate.
- Once done, leave the picture in fridge for 10 minutes to set. Since we were doing it in an aircon room we just left it outside, the melted chocolate would set too.
- Once the chocolate is set, bring out the cake from freezer. The whipped cream on cake should be hard now (I actually freezed overnight). Place the picture on cake (chocolate side down). Use a flat spatula to run all over the picture, apply little pressure. (Now you know why we need to freeze the cake)
- Take away the paper slowly; the picture outline (chocolate) should be transferred on the cake. If chocolate still remain on paper at certain portions, put it back on cake, use finger to press that particular portions lightly. Then try to remove the paper again.
- Now the picture outline is on the cake. You may pipe melted chocolate over the existing outline again if you wish. I didn’t do that.
- Mix piping jelly with colour and fill in piping bag. Cut a small hole and pipe the piping jelly to fill the picture. We used piping jelly from Phoon Huat in class, the piping jelly was a bit thick, Richard taught us to add little water to make it runnier. Use finger to smoothen the piping jelly after piping on cake. (You will need one piping bag for one colour. I did not want to use so many piping bags so for small portion I just used toothpick to transfer the piping jelly and smoothen with finger).
- Picture cake is done! You may continue to decorate the cake. You may also use the piping jelly for decoration by piping pattern on the cake (without using any tip). Richard showed us how to do it in the class.
There are many ways of drawing / transferring picture on cake. The method we learn in class is probably one of the easiest ways. It really helps for people like me who can’t do free hand drawing. I would think that the picture can also be filled with whipped cream (just pipe little stars) besides piping jelly.
Piping melted chocolate on the outline is not as difficult as I think IF the melted chocolate is at the right consistence. If you do it too slowly the melted chocolate will be hardened then it will be difficult to pipe but if the melted chocolate is too runny it will be difficult to control. At times if you are unable to pipe out the melted chocolate probably the chocolate at the tip is set, just squeeze out the chocolate and you will be able to continue piping.
 |
Picture piped by Richard. See how smooth the line is.
|
You can also use clear plastic sheet (thicker type) to pipe the outline (which Richard did). If using that then do not need to trace the outline of the picture. You can just place the clear plastic sheet directly on picture.
 |
| My completed cake. |


Angel, how to transfer the image to the cake ..
ReplyDeletebecause it will damage the survey of the cake when cover err...
夫人,
Delete可能你看漏了,蛋糕涂完cream后要整个放入冷冻库里冷藏到cream变硬,我是冷藏隔夜。cream变硬后图片放上去就不会把cream弄花。
所以冷藏到cream变硬这个步骤是很重要的。
谢谢你的分享,真的感激不尽:))
ReplyDelete茄子,
Delete不客气。其实我也想趁记忆犹新是把笔记记录下来好让自己以后参考。
好可爱的拉拉熊(^○^)
ReplyDeleteJess,
Delete谢谢。
原来是这样子做的哦,谢谢分享 :)
ReplyDeleteCass,
Delete不客气。
Nice Job!!!
ReplyDeleteThanks Ann.
Delete好精彩的示范^^
ReplyDelete给你多多个赞!
sean,
Delete谢谢你的“赞”!
thanks for your sharing. i learn a lot.
ReplyDeletexing hui,
DeleteYou are welcome!
thanks for your detailed and selfless sharing! i really enjoy reading your blog. keep it up!
ReplyDeletejellyfish21,
DeleteThanks for your encouragement.
This comment has been removed by a blog administrator.
ReplyDelete非常好的分享。谢谢你哦。你的蛋糕做得很美。
ReplyDeletejoceline,
Delete谢谢哦。