Pages

Tuesday, April 28, 2009

Peanut Butter Chocolate Chips Cookies 牛油花生巧克力粒曲奇

我并不是Chocolate Chips Cookies的粉丝,但女人嘛总会有些时候突然想吃某种甜点。

自己做烘培的好处就是随时想吃什么,只要不是太难的都能马上动手做,很快的就有新鲜出炉的东西吃了。我家里的基本烘培材料(面粉、发粉、牛油、牛奶、巧克力粒、葡萄干等等)都是保持常满的。试过家里的米缸没米,但是还没试过没面粉。哇哈哈!

打开冰箱发现一罐刚打开的花生酱(这是D涂面包吃的,我平时很少吃),喜欢搞怪的我想到把花生酱加入曲奇里(应该会很香吧?!)做成Peanut Butter Chocolate Cookies。

把一大匙的花生酱加入牛油和糖一起打,在打的时候,我已闻到阵阵花生的香味,让我对成品很期待。

烤好的曲奇吃第一个时不觉得特别美味,但越吃越好吃,停不了口。搞到我两三天就把所有曲奇解决掉,本来要带给爸爸妈妈吃的都进了我的肚子。

D只意思意思吃了一个,因为曲奇这种东西不是他的那杯茶(其实我有点小开心,因为没有人跟我抢着吃,哇哈哈! )

这曲奇松脆但又不像外面卖的那么脆,吃了喉咙很干的那种。(不知道是不是因为我没加发粉,还有苏打粉的份量也加得很少的缘故)

味道带有香浓的奶油味(我用Golden Churn),还有份量适中的巧克力粒,吃完后嘴尾还存留淡淡的花生香。

Ingredients:(yield about 45 cookies)
90g butter (soften at room temp)(use SCS or Golden Churn brand)
2 tbsp peanut butter
110g caster sugar
1 egg (room temp, lightly beaten)
1 tsp vanilla extract/essence
180g plain flour
¼ tsp baking soda
100g chocolate chips (or more if you like)

Method:
1) Cream butter, peanut butter and sugar until the mixture turns pale and fluffy.
2) Add spoonful of egg gradually. Mix well after each addition then add vanilla extract, mix well.
3) Sift flour and baking soda over the mixture, fold in with a spatula. Fold in the chocolate chips.
4) Drop spoonfuls of the cookie dough onto lined baking tray (use 2 small spoons, one for scooping and another one for 'pushing' the dough onto the baking tray). Leave some space between the cookies to allow for spreading. Flatten cookie dough slightly with the back of a fork.
5) Bake in preheated oven at 180C for 10mins or until cookies turn golden colour.
6) Transfer to a wire rack to cool completely and keep in airtight container.

Note:
1) Use upper or centre rack for baking.
2) Cookies may be a bit soft when they are just out from the oven, this is normal, they will be harden and become crunchy after a while.

Monday, April 27, 2009

Kare (Japanese Curry) 日本咖哩

如果要选现在城中最火红的食物,我想日本咖哩一定入围。

日本咖哩突然在城中火红,专卖店开了一家又一家。所以,我也来凑一凑热闹,买了日本咖哩块(Japanese Curry Roux) 在家里尝试自己煮。

记得多年前到台湾出差时经过一家日本咖哩专卖店,远远的就闻到那股印度咖哩味,我对它是敬而远之(那时心里想要是这家店开在在新加坡一定早就关门大吉)。

印象中我只在两三年前吃过一次日本咖哩。记得那时我吃了不到三份之一就吃不下去了。

没想到多年后的今天吃了自己煮的日本咖哩后我竟然开始爱上它,觉得它带甜和浓稠的gravy拌饭吃别有一番风味。不知道是我的口味改变,还是现在的我更能接受外来食物了。

我煮的日本咖哩没加入肉类,所以是素食日本咖哩。我配日式日式炸鸡排吃。

跟着包装上的指示做非常简单。食谱用英文写方便大家阅读。如果要中文食谱,请给我留言。

Ingredients: (serving of 3)
60g Japanese curry roux (depending on individual brand)(cut into small pc)
1-1/2 cup hot water
2 medium onion (chopped)
1 carrot (cut into small bite size)
3 medium potato (cut into small bite size)
100g pumpkin (cut into small bite size)
5 big canned mushroom (sliced)

Method:
1) Heat oil, sauté onion till fragrant (become semi-transparent).
2) Add carrot and potato, sauté for a while (about 1 min).
3) Transfer to a pot, add water and bring to a boil. Lower heat, simmer for about 15-20mins (carrot & potato should be semi-soft now).
4) Add pumpkin and mushroom, continue to simmer till carrot and potato become soft.
5) Add Japanese curry roux, keep stirring till dissolved.
6) Simmer for a while till gravy become thick, serve.

Note:
1) Add meat or other ingredients if you like.
2) Add the curry roux gradually and taste it at the same time. Stop when you find the taste is just nice (i.e. you may not use up all 60g).
3) Add more water if you find the gravy is too thick.
4) I served it with Chicken Katsu. They are perfect match.

Sunday, April 26, 2009

Japanese Curry Roux 日本咖哩块

100g - about SGD3.90 (for serving of 5~6)

This is available in major supermarket. I bought mine from NTUC. There are two versions, 'Hot' and 'Mild'. I chose the 'Hot' one.

It is really convenient to use. I wonder when our local style curry premix sauce can be transformed into cube form.

Friday, April 24, 2009

【简单清淡的】鱼丸拉面 Fish Ball Ramen

像这样清清淡淡的面汤D最喜欢了,尤其是加入了他最爱的鱼丸。

汤底是用江鱼仔熬成的,很清淡。拉面的软硬适中,爽口润滑。


记得以前我刚开始煮时常常把拉面煮得太软,后来发现这是因为第一次烫面时我就把面烫到刚刚好,其实应该烫到半软就好了。

还有就是一定要过冷河,过了冷河后最好马上就加入汤里,不然面会粘在一起和变软。

我的做法如下(一人份):

事先准备好江鱼仔汤底, 一杯半的水和江鱼仔煮滚,转小火煮一下,熄火。让江鱼仔浸泡在水里直到变浅色(代表江鱼仔的味道都跑到汤里了)。

另一个锅煮滚水,加入一团拉面,烫至半软,捞起过冷河。

再次煮滚江鱼仔汤,先加入青菜,煮熟捞起。

加入拉面煮到滚后,加入鱼丸、肉碎和调味料,煮一会儿至鱼丸和肉碎一熟就能上桌。

上桌后加入煮好的青菜和炸小葱趁热享用。

小小心得/建议:

可以一次过煮多一点江鱼仔的汤底,待冷却后收入冰箱可以留到隔天。

Wednesday, April 22, 2009

Chicken Katsu (チキンカツ) 日式炸鸡排

名字只是一个噱头,其实只有用的面包糠 (panko)是日式的,其他的调味料都很中式,哇咔哇咔!

日式面包糠和西式的最大不同是日式的比较幼和软,我买的又是特幼的(包装上写‘细目’),所以炸好后看起来好像是没沾面包糠。

面糊的配方是从一个介绍日本美食的杂志看到的,我自己加入了调味料。出来的效果挺不错的,很香脆,不会含油,又不会太厚。

食谱用英文书写方便大家阅读。如果需要中文食谱,请给我留言。

Ingredients:
2 boneless & skinless chicken legs (thighs + drumsticks)
1-½ to 2 cups panko (Japanese breadcrumbs)

Marinade:
1tbsp light soy sauce, 1tbsp cooking wine (use Sake if you have), 1tsp oyster sauce, 1tsp sesame oil, ½tsp sugar & ½tsp salt

Batter:
½ cup plain flour, pinch of salt & pepper, 1tbsp cooking oil, 1 egg, 90ml cold water
* Mix together and stir till smooth

Method:
1) Cut chicken leg into 2pcs, pound lightly, marinate for a few hours or overnight.
2) Dip chicken in batter and then coat with panko.
3) Deep fry in hot oil over medium heat till light gold colour, turn to high heat continue to fry for a while. Remove when turn to golden brown.
4) Cut in slices and serve.

Note:
1) The batter will produce a thicker outer layer. If you prefer thin outer layer, just mix a bit of cornflour with chicken, dip in beaten egg and then coat with panko.
2) Use the remaining batter to fry other stuff.

Panko (パン粉) 日式面包糠

150g - RM3.90 (bought from Jusco)

Panko is Japanese breadcrumbs. It is made from bread without crusts. Thus, it is finer and softer than western style breadcrumbs.
The one in the picture is extra fine Panko, the texture is more powdery than the normal type.

Tuesday, April 21, 2009

Coconut Pandan Cotton Cake 椰香班兰棉花蛋糕

蛋糕体是我一贯使用的海绵蛋糕,但我增加了液体(牛奶)的份量,不知道是不是这个原故,蛋糕特别柔软,就像棉花一样,所以我把它叫做棉花蛋糕。

这是蛋糕的内部组织。看得出蛋糕很柔软吗?

(每次要拍成品的texture时我都很伤脑筋,不知道要怎么拍才能表现出来,而且又没有自然灯光。)

椰香指的是加入蛋糕糊里的咖椰(Kaya)和洒在蛋糕表面的椰粉。

因为是第一次尝试加椰粉,所以我只洒了一点。我也保留了一些蛋糕没洒上椰粉,比较后觉得味道没什么分别。

反而是那一汤匙的Kaya让蛋糕的味道特别香浓,即使我只用牛奶而不是椰浆。

蛋糕在烤时香味四溢,整间屋子弥漫着香味,直到蛋糕出炉后还久久不能散去。

这就是我用的Kaya,这个牌子的Kaya是D推荐的。他常买来涂面包吃,400g 大约SGD2.50。

总共做了九个小杯和六个大杯,大杯的没洒上椰粉。

大杯的蛋糕表面有点裂痕,不知道是不是烤箱太热的关系。

Coconut Pandan Cotton Cake 椰香班兰棉花蛋糕

Ingredients:
(A)
4 eggs (room temperature)
80g sugar
1 tbsp kaya
¾ tbsp ovalette (aka sponge cake emulsifier or SP)
1 tsp pandan paste
100g cake flour (sifted)
½ tsp baking powder (sifted)

3 tbsp evaporated milk (you may use coconut milk for richer taste)
(B)
3 tbsp canola oil
(C)
Coconut cream powder


Method:
1) Beat sugar, kaya and ovalette in (A) till well mixed (less than 1 min).
2) Add the rest of ingredients in (A) and beat at high speed till ribbon stage (mixture should be thick and fluffy)(it takes my small mixer about 7–8 mins).
3) Add (B) and mix till well blended at low speed (should take only a few seconds. Do not over mix).
4) Scoop batter into baking paper cup till ¾ full and sprinkle some coconut cream powder on top.
5) Bake in preheat oven at 190C for about 15–20 mins or till a toothpick inserted comes out clean. Cool on wire rack.

Note:
1) The small cups were done in 15mins whereas the big cups were done in 20mins. I lowered the temp to 180C when the cake surface started browning.
2) If you use a big mould, bake at 180C for longer time till a toothpick inserted and comes out clean. Do monitor and lower the temp if you find the cake is browning too fast.

Coconut Cream Powder 椰浆粉

50g/pack - about SGD0.60

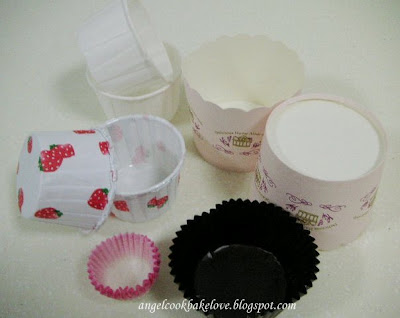
My Baking Cups 我的烘培杯子


这些是我拥有的烘培杯子。除了白色的是同事送的外,其他的都是在Phoot Huat买的。

Phoot Huat卖的烘培杯子都是大量出售的,所以价格也比较便宜。缺点是一款要用很久才用得完。搞到我一直跟自己说一定要用完了才可以买新的。

后面三种不需使用模型,面糊直接倒在里面就能拿去烘了,拿去蒸也行。

前面褐色的是用来垫muffin tray的,不能单独使用。

你可能会好奇,那个粉红色边的迷你杯子是做什么用的。我当然不会用它来烤蛋糕(我可没那个耐性)。那是我过年时买来为我的黄梨塔扮美美的,就像这样

黄梨塔穿上衣服后美吗?

Sunday, April 19, 2009

Apple & Fig Soup 苹果无花果养颜汤


很适合女生喝的食疗养生汤,有美颜的作用。

无花果能润肺生津,滋阴养胃。南杏北杏则有润肺,止咳化痰的功效。北杏仁略苦,所以与南杏仁搭配使用时,比例要减少些许。

汤的味道很清甜,Angel觉得特别适合在炎热的天气喝。


我的做法如下:

2粒苹果(去芯,切大片)
150克瘦肉(切大块,放入滚水氽烫,去腥)
3粒新鲜的无花果(切半)
南杏北杏几撮(北杏带苦,份量要比南杏少些)
4碗水煮滚,加入所有材料大火煮20分钟,转小火煮约3小时变一碗。加入少许盐(随意)。

2 apples (cut into big pcs)
150g lean pork (cut into big pcs, blanched)
3 figs (cut into half)
Pinch of sweet almond and bitter almond (the amount of bitter almond should be slightly lesser than sweet almond)
4 bowls of water bring to a boil, add in all ingredients cook with high heat for 20mins, turn to low heat, simmer for about 3hrs to become one bowl. Add a pinch of salt (optional).

Friday, April 17, 2009

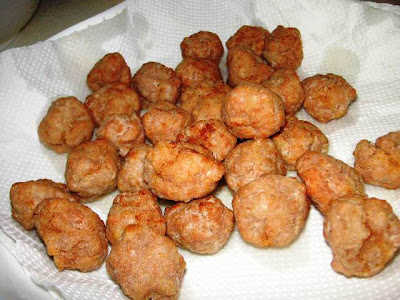
Sweet & Sour Meat Ball 酸甜小丸子

这道菜其实就是俗称的咕噜肉,但我换成由绞肉做成的肉丸。

Ingredients 材料:
Minced pork 绞肉
Tapioca flour 茨粉
Bell pepper, onion, tomato 灯笼椒、洋葱、番茄
* Marinate minced pork with sesame oil, light soy sauce, pepper, Chinese cooking wine & cornstarch. Roll into balls and coat with tapioca flour, set aside.

* 绞肉用麻油、酱青、胡椒粉、花雕酒和粟粉腌。捏成球形,沾上茨粉,待用。

Sweet & Sour Sauce 酸甜酱:
Tomato sauce 番茄酱 4tbsp
Chili sauce 辣椒酱 3tbsp
Sugar 糖 1-1/2tbsp
Salt 盐 1/2tsp
Vinegar 醋 1tbsp*
Sesame oil 麻油 few drops 几滴
Water 水 1tbsp

* I used apple vinegar & a little bit of black vinegar, apple vinegar can be replaced by white vinegar or lemon juice.
* 我用苹果醋加一点黑醋,苹果醋可用白醋或柠檬汁代替。
(1tbsp = 1汤匙)
(1tsp = 1茶匙)

Method 做法:
1) Heat oil, deep fry meat balls till light gold, set aside.
热油,把沾上粉的肉球放进油锅里炸至浅黄色捞起。
2) Reheat oil, fry meat balls again till golden colour, set aside.
再次热油锅,把肉球倒入炸至金黄色,捞起待用。
3) Keep some oil, add in the rest of ingredients, saute till fragrant (I add onion first).
倒掉多余的油,留一点爆香所有配料(我先下洋葱)。
4) Add sweet & sour sauce, bring to a boil (simmer for a while till thick).
倒入酸甜酱煮滚 (要滚一会儿,让酱汁变较浓稠)。
5) Add meat balls, stir fry till all meat balls are coated with the sauce. Serve.
倒入炸好的肉球,快速翻炒至均匀,即可上桌。


小小心得:
1) 翻炸可以使肉球更脆,不易变软。
2) 第一尝试用茨粉炸肉,之前我过用粟粉或粟粉+面粉。我觉得用茨粉的效果最好,外皮较脆,不易变软。
3) 我用的那三种配料是我最喜欢的,除此之外一般的配料还有黄瓜,黄梨等等,依个人喜好而定。
4)调酸甜酱时可试一试味道,看什么味道不够再加。我其实没有根据一定的份量,都是边试边调。
5)除了猪肉外,酸甜酱也可用来煮其他的,我曾用来煮炸鸡和虾

Thursday, April 16, 2009

Home-made Roasted Pork 自制烧肉


这是去年年底第一次在家自己做的烧肉。

外面卖的烧肉很贵,所以想尝试自己做。其实小时候我是不敢吃烧肉的 ,因为不敢吃肥肉。长大后就爱上了烧肉脆脆的皮和咬下去肥瘦相间的口感。

上网找了做烧肉的食谱,有简单的也有比较复杂的。食谱是Angel根据家里现有的用料,再自己简化步骤(没办法,Angel就是这么爱shortcut)。
材料:三层肉 1公斤
盐 1汤匙
胡椒粉 1汤匙
五香粉 1 汤匙
做法:1)在三层肉的皮刺满小洞。
2)在肉的部分每隔约1公分横竖割一刀(不要切太深,大约切到肥肉的部分)。
3)整块肉连皮涂满盐。
4)胡椒粉和五香粉混合均匀涂在肉的部分(肉的旁边也要记得涂,避免沾到皮),腌制几个小时。

5)放入预热的烤箱,肉向下(如图),180C烤约40分钟,转200C烤约20分钟至表皮变脆。(更新:开始用200C烤,最后10分钟转到220C)


小小心得/建议:
1)照片里的烧肉只有约650克,所以调味料的份量我都跟着比例减少。
2)烤盘里可加入耐煮的蔬菜一起烤,蔬菜吸收烤肉时滴下的肉汁很美味。
3)烤到一半时转一转肉的方向,这样烤得比较均匀。
4)烘烤的时间和温度依个别烤箱而定,以上是根据我的烤箱而做的调整。烤时要自己拿捏。
5)烤到最后几分钟时转为上火只烤皮因为怕肉会烤得太干。
6)不要忘了在烤盘铺上锡纸,不然油腻腻的很难清洗。
7)烤了约40分钟后,烤箱里会传出pok pok的声音,这是皮开始变脆的美妙音响,好吃的烧肉就快出炉了。
8)烤好后待10分钟才切烧肉。

后记:
对第一次做烧肉的成果感到相当满意,皮是脆脆的,肉质不会太硬,咬下去时还有肉汁。值得一提的是一起烤的蔬菜吸收了肉汁,不需加任何调味料就已经非常好吃,简直是喧宾夺主,我还后悔为什么没加入多一些蔬菜一起烤。

Tuesday, April 14, 2009

Angel @ First Bread 面包初体验

在2009年2月份的某一天我的第一个面包终于诞生了。

一直以来都想自己尝试做面包,因为从小就很喜欢吃面包。
以前曾经买过面包粉结果放太久都没有行动,最后索性把它丢了。

第一次做应该从最简单的开始,所以我选择了做甜面包(sweet bun)。

参考了若干食谱,很多都需要很长的发酵时间,只有这个看起来最简单,适合没什么耐性的我。

把材料混合后就开始揉。
我没有面包机代劳,mixer又太小,所以就只得靠我的一双手了。

面团很粘手,但我忍着不要加粉,一直揉到约20分钟的时候‘奇迹’出现了,面团变得有弹性而且没那么粘手了。

我继续揉,到第30分钟时我的手已经很累了。
我捏了一小块面团做windowpane test,面团拉成薄膜后还是会破,所以我继续揉。
到第40分钟时我已经开始流汗了,不管了,成不成我也没力气揉了。

把揉好的面团放入大碗里,盖上湿毛巾,然后我又很怕输的盖上多一层保鲜膜,最后我把它放入烤炉了发酵(因为我想烤炉里比较温软,发酵可能会更好,不过记得不要开电)。

一小时后看到面团涨到这么大,我心里哇哈哈的大笑。

往面团打几拳把空气打掉后的面团,让面团再休息约15分钟。

面团分割成60g一个,放入已涂油的方形烤盘里,继续休息15分钟。
最后涂上蛋液(我有加一点牛奶在蛋液里),撒上杏仁片就可以送入烤箱里。

烤箱预热至180C,烤约15分钟香喷喷的面包就出炉了。
我觉得面包上层的颜色有点黑,所以下次可能烤12分钟就够了。

面包的组织,松软但扎实,是我喜欢的texture(我不喜欢吃那种太‘轻’的面包,一咬下去就变很扁的那种)。

另外的半份面团,我加入葡萄干,然后把面团擀平,用手捏着两端卷(twist)成一团后放入muffin tray里发酵,再拿去烤。

这就是成品。卷得很难看。

因为经卷曲过的缘故,可看到一丝丝的面包组织。
口感和上面的甜面包稍微不同,这个更扎实了。
吃时还可以拉出一条条的面包丝。

D给我第一次做的面包打90分。
爸爸妈妈说比外面买的还好吃。
哇哈哈
他们一个两个可真会逗我开心。
所以我决定再接再厉做更好吃的面包给他们吃。

Sweet Bun 甜面包
Ingredients: (make around 18 nos. x 60g portion)

300g bread flour
300g cake flour
10g active dry yeast (I used 1 sachet of instant yeast = 11g)
6g salt
250g milk (1 cup)
2 eggs
120g caster sugar (I cut down to 110g)
100g butter
(1 egg, beaten, for glazing)

Method:

1) Mix all dry ingredients in a mixing bowl. Add in milk, egg and butter. Mix into a dough.

2) Place the dough on a lightly floured work surface. Knead the dough until the gluten is fully developed (see tip below) and the dough is elastic, smooth and non-sticky. It will take about 25 mins to knead the dough by hand. Initially the dough will stick on to the work surface. Do not be tempted to add more flour or even give up kneading! After continuous kneading, the dough will no longer stick to the work surface.

3) Place the dough in the mixing bowl and cover with a damp towel or cling wrap to seal in the moisture. Allow the dough to ferment(or proof) until double in bulk. This will take about 1 hr in our Singapore weather. To test whether the dough has been fully proofed, press a finger into the dough and withdraw quickly. It should leave a deep impression and spring back very slowly. For an insufficiently proofed dough, the impression will spring back instantly.

4) Take out the dough and punch out the gas produced. Let the dough rest for about 15 minutes.

5) Divide the dough into 60g portions. Shape and add fillings as desired. Arrange dough in a greased or lined pan. Rest for about another 15 minutes.

6) Brush the top with whole egg mixture. Add almond flakes on the top of the buns, as desired.

7) Bake for about 15 minutes in a preheated oven at 190 degC. Remove from pan and cool on wire rack.

Note:
To check whether the dough is fully developed, take a small piece of the dough and stretch it with your fingers. If it can be stretched into a thin layer without tearing easily, the dough is fully developed.

(Original recipe adapted from Angie's recipe)


Instant Yeast 速溶酵母

SGD2.00/box (one box consists of 5 sachets x 11g)

This can be easily found in local supermarket and even convenience store near your doorstep. I bought mine from the provision shop (杂货店) next to my block.


Monday, April 13, 2009

Pork Floss Sponge Cake 肉松海绵蛋糕


Angel老爸一口气吃四个还不够的蛋糕。

肉松甜甜咸咸的,配搭香草海绵蛋糕很对味。

洒在蛋糕上的肉松经烘烤变成了深褐色,Angel觉得不好看。所以,除非是用蒸的,不然不建议在蛋糕上加肉松。

Pork Floss Sponge Cake
肉松海绵蛋糕

Ingredients:
(A)
4 eggs (room temperature)
80g sugar
¾ tbsp ovalette (aka sponge cake emulsifier or SP)
½ tsp vanilla essence
100g cake flour (sifted)
½ tsp baking powder (sifted)

(B)
2 tbsp water
3 tbsp canola oil
(C)
Pork floss


Method:
1) Beat (A) at high speed till ribbon stage (mixture should be thick and fluffy)(it takes my small mixer about 7 - 8 minutes).
2) Add (B) and mix till well blended at low speed (should take only a few seconds).
3) Scoop batter into greased or lined muffin tray until half full, add some pork floss and cover with batter till 80% full.
4) Sprinkle some pork floss on top (optional).
5) Bake in preheat oven at 190C for about 15 - 20 minutes or till a toothpick inserted comes out clean.
6) Remove cake immediately and transfer to wire rack for cooling.

Beating of Whole Egg/Egg Yolk - Ribbon Stage

Lift up the beater, the egg mixture will form thick ribbon when dropping.
Write a '8' on the mixture, the trail will stay visible for a while before merging back into the mixture.

Ovalette (aka Sponge Cake Emulsifier or SP) 蛋糕乳化剂

Bought from Phoon Huat - 250g around SGD2.50
Ovalette is a stabiliser used in baking sponge cakes. It helps the eggs to rise rapidly and stiffly.
As it is acidic it also helps the beaten eggs to remain stable and not lose the airy and voluminous texture. It makes sponge cake softer and smoother.
(Source: Diana's Desserts Forum)

Muffin Tray 松糕烤盘

Bought from Ikea last year - SGD12.00


Sunday, April 12, 2009

Pandan Ma Lai Ko (aka Malay Sponge Cake) 班兰马拉糕

小时候家人逛pasar malam(夜市)总是爱买些糕点回家享用,马拉糕是必买的其中一种糕点。

记得pasar malam卖的马拉糕是浅褐色的,切成一片片,口感有点像蛋糕又有点像发糕,我并不是很喜欢吃。
其实那时我并不知道它的名字,直到长大后光顾港式点心店才知道马拉糕这名字。港式的马拉糕是黄色的,做成椭圆形,卖相好多了,个人觉得也比较好吃。

看到Olivia的马拉糕,卖相很好,看上去就是很柔软的感觉,再看看食谱,很简单!马上让我有股欲望想要尝试做。
马拉糕的正面
马拉糕的反面
我两面都喜欢,你呢?
我稍微修改了食谱,一共做了24个马拉糕(15个用小蛋挞模型,9个杯子蛋糕的纸杯)。数一数我一个人就差不多吃了整10个,还真会吃呢!

马拉糕很软很幼,有着淡淡的班兰香味,口感并不是很像外面卖,不过很好吃。爸爸还特地叫妈妈买了新鲜椰丝来配着吃(难得爸爸那么有兴致自创新吃法)。

Pandan Ma Lai Ko (aka Malay Sponge Cake) 班兰马拉糕
To me this doesn't really taste like the authentic Ma Lai Ko but the texture is super fine and taste is good too. If you like steamed cake, you will like this.
I made this on Thursday night and kept some for Saturday's breakfast, they still tasted as soft.
Ingredients:
(A)
180g brown sugar (use 200g if you have a sweet tooth)
5 eggs
(B)
120g canola oil (I think can be reduced to 100g or lesser)
130g milk
1 tsp pandan paste
(C)
280g plain flour
25g corn flour
2 tsp baking powder
½ tsp baking soda
Method:
1) Whisk (A) till sugar dissolves then add in (B) and mix till smooth. Sift in (C) and mix well. Rest for 25 to 30 mins.
2) Pour batter into greased moulds and steam at high heat for 10 – 15 mins or until cooked (insert a skewer and it comes out clean).
3) Remove from moulds and cool on wire rack.

Note:
Steaming time depends on the size of Ma Lai Ko; if you use a big mould, increase the steaming time accordingly.

Related Posts Plugin for WordPress, Blogger...
"总觉得用心准备的食物不只是味蕾的触动,也是一个记忆,一个我想留给身边心爱的人的记忆。这也就是我用心做菜,细心专研的原因和推动力。"