Pages

Tuesday, April 30, 2013

Happy Birthday to April Boy ~ Rose Mango Layer Cake 玫瑰芒果夹心蛋糕


过去的周末D过生日,和往年一样生日前都会先问他要什么生日蛋糕,答案也是一样,就是芒果蛋糕。四月份本来就是芒果的季节,用当季的食材最好不过。

敲定蛋糕主题后我开始在想究竟要做芒果慕斯蛋糕还是一般的芒果夹心蛋糕。虽然很想尝试制作芒果慕斯但想到要下了班等宝贝睡着后才能开工,最后还是选择了比较少工序的芒果夹心蛋糕。


Thursday, April 25, 2013

Richard Goh’s Cake Deco Class 5: How to Make 3D House Cake?

7th April 2013

We are going to build and design our own (edible) house and garden this week. I would think that this is something you can do together with your kids for bonding session. It is really fun.

  
What you need?
  • A square 8” or 9” butter cake (height 2”)
  • A square 10” or 11” sponge cake (height 1”)
  • Knife
  • Flat spatula
  • Whipping cream (or buttercream)
  • Desiccated coconut + green food colour ( for the “grass”)
  • Piping jelly + blue food colour( for the “pool”)
  • Candies, cookies, marshmallows…..(for decoration)
  
What I learn from this class?
  •  Cut and form a house shape from a square cake
  
How to make a 3D house cake with garden?

1) Level the butter cake. Cut into half (must be precious).


2) Spread cream on one piece of cake and stack another piece on top.


3) Divide cake into 3 equal portions, cut out 1/3 of it (must be precious).


4) Lift up the 1/3 portion of cake to standing position.  Cut diagonally into 2 triangles.


5) Place the 2 triangles together to form the “roof”.  Joint them with cream.


6) Place “roof” on top of the remaining 2/3 of cake. Joint them with cream. Now a house shape cake is formed.


7) Spread cream on the sponge cake. Then place the “house” on top of your preferred position.


8) Spread cream to cover the “house”. If you are going to cover with all the decorative stuff you just need a crumb coat. If you are exposing the cream then you have to cream it nicely but it is not easy to frost a 3D figure smoothly.

9) You may start to decorate your house now follow by garden. If you are going to cover the garden with “grass”, do it after completing the house decoration. Just mix desiccated coconut with green colouring. Sprinkle on top of the sponge cake and coat the sides. If you want to have a “pool” in your garden, just reserve an area for it (don’t sprinkle desiccated coconut on top) and add piping jelly on top.


So here is my creation, overly sugared house, haha.


The house and garden were built from these 2 cakes, top – Rum Butter Cake, bottom – Pandan Chiffon Cake.

For the Pandan Chiffon Cake I used the same recipe as this Matcha Chiffon Cake, omitted the matcha powder and added about ½ tsp of pandan paste.


The “tiles” and the “windows” were also made of the same cake. I piped excess batter on macaron mat and sieved some icing sugar on top before baking.


My original design, can you tell the difference?


I managed to take some photos of my classmates’ creations.  Aren’t they pretty? I am really glad that I am able to learn together with a group of talented and passionate home-bakers. Thumb up everyone!


Tuesday, April 23, 2013

Rum Butter Cake 兰姆酒牛油蛋糕


一般做牛油蛋糕我喜欢加香草精,之前也试过加兰姆酒但只加一点,这回敢敢加一大匙,味道果然不同。蛋糕的味道变得好有层次感,没试过的朋友可要试试。

Thursday, April 18, 2013

Richard Goh’s Cake Deco Class 4: How to Make Cutout/Figure Cake? (Matcha Chiffon Cake with Blueberry Fillings)

31st March 2013

We have one week break last week. This week we are making cutout cake, in this class we concentrate on figure, A-Z or 1-9.

A cutout cake is a 2D cake formed in the shape of a particular character or image. The cake design is similar to, but simpler than, that of a 3D cake. Basically once you learn the principle you can turn just about any image into a cutout cake. They are all free hand cut, so you are not required to buy any special mould.

We were told to bring a square or rectangle cake this time. We also need to think of the figure we want to make and draw on paper. Richard will check our sketch in the class before we cut the cake.


What you need?
  • A square or rectangle basic sponge cakes (Richard suggested not smaller than 9”)
  • Turntable
  • Knife
  • Flat spatula
  • Whipping cream
  • Piping bag
  • Food colour

What I learn from this class?
  • Principle of cutout cake
  • Frosting of cake in irregular shape
  • Free hand cut of cake in irregular shape

How to make cutout/figure cake?

  • Take a piece of paper, same size as your cake and sketch the figure (in my case I am making “4”). The “body” must be broad; the principle is to minimize cut and wastage. Do not cut out any hole at the centre, we can pipe different colour of cream to represent the “hole”.   

  • Once you are satisfied with the sketch, cut out the shape.

  • Level and slice the cake as usual. Then place the cutout paper on the cake. Cut the cake according to the shape. When cutting straight line just hold the knife as usual (horizontally) but when cutting curve, you need to hold the knife vertically and move the knife in “up down up down” motion to cut the cake.

  • Once done, you can start to apply cream and add fillings to each layer. You can also do that before cutting out the shape.

  • Crumb coat the whole cake as usual. Then apply another layer of cream (the actual frosting). For the actual frosting unlike round cake which we start to frost from the center, for cutout cake we start from corners. After which, smoothen the top with spatula in one direction. For the sides, technique applied to round cake doesn’t apply here. To get 90 degree angle hold the spatula horizontally and “cut” downwards (like cutting cake). This is not as easy as it sounds! At our level it is difficult to get smooth and nice sides due to the shapes and angles, so Richard suggested us to coat the sides with chocolate rice, almonds flakes etc.

  • After frosting the whole cake you can start to decorate the cake.  


I only have one 8” and one 11” square tin. 8” is too small so I used the 11’ square tin to bake my cake. Since I was making number “4”, a rectangle cake should be more suitable. So I trimmed my cake into about 9” x 11”.

My cake decoration was very simple. I hided the ugly side frosting by piping little stars all over. I then piped shell around top and bottom borders. I also piped stars at the centre to represent the “hole” in the number “4”. (Note: Green - Wilton tip # 20, Pink - Wilton tip #32). When all the piping was done, I decorated with some ready-made icing flowers and marshmallows (in a way I also used them to cover flaws: P).


For the cake base, I made chiffon cake instead of sponge cake this time. It was matcha chiffon cake with blueberry fillings. First time trying this combination, believe me they are very matching.

I adapted the basic chiffon cake recipe from “Creative Making of Cake” by Chef Alex Goh. I replaced partial flour with matcha powder, replaced water with milk, cut down sugar and liquid in the recipe. The reason I cut down liquid was because I wanted a firmer cake. Nevertheless, the cake was still very soft and moist. Alex Goh’s recipe is always very forgiving. 

I am sharing my modified recipe.

Matcha Chiffon Cake

  
   Ingredients:
   (A)
   8 egg yolk
   90g sugar
   (B)
   100g milk
   140g vegetable oil
   1/4 tsp salt
   (C)
   138g plain flour/cake flour
   12g matcha powder
   2 tsp baking powder
   (D)
   8 egg white
   180g castor sugar
   ¼ tsp cream of tartar

   Method:
  • Please refer to HERE.
  • The above amount is for my 11”x11” square tin. The egg whites only need to be beaten till soft peak. I only lined the bottom of the pan and did not line or grease the sides.
  • If baking in chiffon tin, beat the egg whites till stiff peak. The above amount is good for a 25cm (10”) chiffon tin or you can half the recipe for a 20cm (8”) chiffon tin.
   

I am submitting this post to Aspiring Bakers #30: it's Tea time! (April 2013) hosted by Food Playground.
Tuesday, April 16, 2013

Richard Goh’s Cake Deco Class 3: How to Draw Picture on Cake?

17th March 2013

This week we are making picture cake. We were told to cream and freeze the cake at home. Why the cake needs to be frozen? You will find out later.

I have spent quite some times thinking and finding the picture I wanted to do. Unfortunately, the blur me forgot to bring the picture to class! (Disaster, isn’t that?) Luckily, a very nice classmate of mine brought extra pictures and I managed to pick a picture I liked.


What you need?
  • A basic sponge cake (any shape) (Richard suggested not smaller than 8”)
  • Turntable
  • Knife
  • Flat spatula
  • Whipping cream
  • Piping bag or make from scratch using tracing paper
  • Piping jelly
  • Food colour
  • Cooking chocolate aka compound chocolate
  • Picture (make sure it is smaller than the size of cake)
  • Tracing paper

What I learn from this class?
  • Trace picture outline with melted chocolate and transfer it on cake
  • Use of piping jelly 

How to draw picture on cake?  

  • Cream the whole cake with whipping cream. If you want to decorate the side or coat the side you can do it now but do not pipe anything on the top border. Freeze the cake.

  • Place a tracing paper (cannot use parcement or greaseproof paper) on the picture and trace the outline of the picture using pencil/ pen.

  • Place cooking chocolate (cannot use converture) in a bowl (make sure the bowl is dry) and melt over simmering water. Stir from time to time.

  • Add little melted chocolate in piping bag and cut a small hole. The best temperature of melted chocolate for piping is 40C. You only need very little melted chocolate, balance melted chocolate can be kept in fridge. Thaw overnight in room temperature if you need to melt it again. As advised by Richard, you can’t melt the chocolate directly from fridge.

  • Pipe melted chocolate on the outline of the picture. You may pipe on the opposite side of the tracing paper (i.e. mirror image so when you flip over the image will be the right side). When piping, do not drag the melted chocolate.

  • Once done, leave the picture in fridge for 10 minutes to set. Since we were doing it in an aircon room we just left it outside, the melted chocolate would set too.

  • Once the chocolate is set, bring out the cake from freezer. The whipped cream on cake should be hard now (I actually freezed overnight). Place the picture on cake (chocolate side down). Use a flat spatula to run all over the picture, apply little pressure. (Now you know why we need to freeze the cake)

  • Take away the paper slowly; the picture outline (chocolate) should be transferred on the cake. If chocolate still remain on paper at certain portions, put it back on cake, use finger to press that particular portions lightly. Then try to remove the paper again.

  • Now the picture outline is on the cake. You may pipe melted chocolate over the existing outline again if you wish. I didn’t do that.

  • Mix piping jelly with colour and fill in piping bag. Cut a small hole and pipe the piping jelly to fill the picture. We used piping jelly from Phoon Huat in class, the piping jelly was a bit thick, Richard taught us to add little water to make it runnier. Use finger to smoothen the piping jelly after piping on cake. (You will need one piping bag for one colour. I did not want to use so many piping bags so for small portion I just used toothpick to transfer the piping jelly and smoothen with finger).

  • Picture cake is done! You may continue to decorate the cake. You may also use the piping jelly for decoration by piping pattern on the cake (without using any tip). Richard showed us how to do it in the class.

There are many ways of drawing / transferring picture on cake. The method we learn in class is probably one of the easiest ways. It really helps for people like me who can’t do free hand drawing. I would think that the picture can also be filled with whipped cream (just pipe little stars) besides piping jelly.

Piping melted chocolate on the outline is not as difficult as I think IF the melted chocolate is at the right consistence. If you do it too slowly the melted chocolate will be hardened then it will be difficult to pipe but if the melted chocolate is too runny it will be difficult to control. At times if you are unable to pipe out the melted chocolate probably the chocolate at the tip is set, just squeeze out the chocolate and you will be able to continue piping.

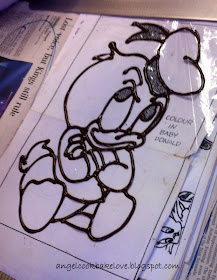
Picture piped by Richard. See how smooth the line is.
You can also use clear plastic sheet (thicker type) to pipe the outline (which Richard did). If using that then do not need to trace the outline of the picture. You can just place the clear plastic sheet directly on picture.

Picture piped by me. It’s mirror image.

Picture transferred to cake (“naked”)

My completed cake.

I made an 8” square cake this time. I frosted the whole cake with tinted blue to match my original picture which was bear and bee. For the sponge cake I used the same recipe as the Basket Weave Cake. Recipe refers to here. I followed the recipe to the T except added lemon rinds from one lemon and about 2 tbsp of lemon juice to the egg yolk mixture.  

Cross section of my cake - lemon sponge cake with Nutella fillings.
 

Monday, April 15, 2013

Cook.Bake.Love 四周年小送礼成绩 4th Blog Anniversary Little Giveaway Result

Cook.Bake.Love四周年小送礼已经在昨日,4月14日结束。谢谢大家的支持。

不难发现很多读者都选礼物二,是不是被“不发胖”的字眼给吸引了?

在进行抽奖前我想要特别注明以下两点:-
  1. 在留言里没有注明要退出抽奖又没有选择礼物的读者,Angel会帮你选择礼物。
  2. 只有在留言里注明是Cook.Bake.Love的follower的读者才会获得多一个抽奖机会(Angel对其他参与的followers感到很抱歉但是这是之前设下的规则所以必须遵守)。

Cook.Bake.Love 4th blog anniversary little giveaway event had ended yesterday, 14th April 2013.

A BIG Thank to your support!

Before the lucky draw I would like to highlight below two points:-
  1. Since all comments will be automatically opted in, so if you didn’t mention to opt out and your preference of gift I will choose the gift for you.
  2. Only readers who mentioned they are followers of Cook.Bake.Love in the comment will get extra entry. (I am sorry to the rest of followers who participated in this giveaway but I have to follow the rule which stated in the giveaway post).

选择礼物(1)的读者 Entries for gift set (1)  


Congratulations to Cass! 恭喜Cass


选择礼物(2)   Entries for gift set (2)


Congratulations to 鲸鱼蓝蓝蓝!恭喜鲸鱼老师!


Please email your full address to loveacbl@gmail.com within 3 days to claim to your prizes. Thank you.

请在三天内电邮你的完整地址和名字到loveacbl@gmail.com。谢谢。


Thursday, April 11, 2013

Richard Goh’s Cake Deco Class 2: How to Pipe Basket Weave?

10th March 2013
This week we are making basket weave cake. This certainly sounds very advanced to me. Although I have seen the technique of piping basket weave in recipe book and Youtube video before I have never imagined I would attend to it one day. Thanks to the class. We were told to bring two cakes this week. I guess it is because basket weave design looks nicer with a tall cake.


What you need?
  • Two basic round sponge cakes (total height 3” to 4”)
  • Wilton tip #22 (open star tip) and #48 (flat tip with teeth)
  • Turntable
  • Knife
  • Flat spatula
  • Piping bag
  • Whipping cream (provided by instructor) (we used non-dairy in class)
  • Food colour
  • Fruits/ Flowers for decoration (optional)
  • Aluminum foil for making basket handle (optional)

What I learn from this class?
  • Pipe basket weave design
  • Fold basket handle using aluminum foil

Preparation
  • Level and slice the cakes into 2 or 3 layers as usual. Stack the cakes and sandwich whipping cream / any filling of your choice. Then crumb coat the cake. 

  • Lift up the turntable/cake (you can put a cake box below). It is easier to work with when the cake is at your eye level. This is the tips I learnt from Richard.

  • Fit two piping bags with Wilton #22 and #48 (I use #20 and #47 which are similar tips but smaller. I do think that #22 and #48 produce better looking basket weave. If using Wilton #47 the teeth is on one side only, so make sure the teeth side is facing outside, means facing yourself). Fill up both piping bags with whipping cream.

  • Now sit down and you can start to pipe. For first timer, I suggest practising on paper first because once one line is piped wrongly you got to redo. This was what happened to me. :P 

How to pipe basket weave? 


1) Mark 3 lines on cake with knife. The distance between lines is about 1” apart. Hold piping bag 45 degree facing downwards, pipe vertical stripe along the center line from bottom to top using Wilton#22 (pink).

2) Pipe horizontal stripe (green) across the pink stripe starting from top, using the marking as a guide for the length of the stripes. The spacing in between should be the same as the width of the tip opening.
 
3) Pipe another vertical stripe along the marking (left line if you are a left-hander, right line if you are a right-hander, it is spontaneous by the way) over the horizontal stripes (the pink stripes should cover the end of the green stripes). Mark another line beside the second vertical stripe (refer to the arrows on the illustration).
 
4) Pipe horizontal stripes (green) to fill up the spacing in between the existing horizontal stripes across the vertical stripe (pink). Use the marking as a guide for the length of the stripes.
 
5) Repeat step 3 and so on and so forth until the whole cake is covered with basket weave.


So here is my first basket weave cake, very ugly piping. As I took too long time to complete the whipping cream had turned dry.

Piping on the side of the cake is not as easy as I think. When piping the vertical stripe, if using too much strength the stripe will “sink” into the crumb coat, therefore it does not look 3D. If using too little strength the stripe will not stick to the crumb coat and may fall down. Piping horizontal stripe seems easier but still need a lot of practice. I think how to end it nicely is a bit tricky to me.


After completed the basket weave I used the same open star tip to pipe the border at the bottom and used Wilton# 1M to pipe the border on top. Then I decorated the cake with canned longan and strawberry bites.

For the sponge cake I used this [Easy to succeed] basic sponge cake recipe, vanilla flavour. I made two 6” cakes, sliced each cake into 2 layers. Since my cakes were quite tall I only used 1 ½ cakes, total 3 layers.

Cross section of the cake – first layer is whipping cream and fresh strawberries; second layer is whipping cream and blueberry fillings.
 
The cake fall apart easily after slicing, I think it is because the cake is tall and another reason could be the whipping cream between the layers is too thin. I should apply more whipping cream next time.

Photo taken in the class

Wednesday, April 10, 2013

[Easy to Succeed] Basic Sponge Cake 容易成功的基础海绵蛋糕


你最怕做的蛋糕是什么?又或者这么问你最没有把握的蛋糕是什么?对我来说答案肯定是全蛋打发的海绵蛋糕。开始做的全蛋海绵蛋糕往往不是不发不然就是上面发下面沉底,虽然后来掌握了全蛋的打发,但是往往成品的素质不一,有时蛋糕发得比较高,有时比较矮。

Monday, April 8, 2013

Richard Goh’s Cake Deco Class 1: How to Cream a Whole Cake & Pipe Different Patterns Using Open Star Tip

3rd March 2013

I wanted to attend Richard Goh’s cake icing and designing class for the longest time. However, due to the class schedule I could not make it until recently because the class would be held on Sunday afternoon, perfect timing for me.

Basically this is an 8-week cake deco class organized by PA and the class is held at community centre. Each week we got to bring our own cake and decorate in the class, Richard would provide the cream and we just need to pay for the ingredient fees.

What you need?
  • A basic round sponge cake (8” or 9”)
  • Turntable
  • Knife
  • Flat spatula (mine was too long, Richard suggested to get an 8” one)
  • Wilton open star tip # 22 (or any open star tip)
  • Piping bag or make from scratch using tracing paper
  • Whipping cream (provided by instructor) (we used non-dairy in class)

What I learn from this class?

  • Level and slice cake into layers. If the cake top is not flat you need to level the cake. After which place it upside-down (i.e. the bottom becomes the top). To slice or level the cake, cake should be placed on tabletop. To slice the cake, one hand presses the top of the cake lightly and the other hand slices the cake horizontally (move the knife from left to right or right to left depending you are a right-hander or left-hander). It is time for me to buy a longer knife!

  • Crumb coat and cream a round cake smoothly. Although I had attended other creaming workshop before but I was not taught to cream the whole cake in such detail. My classmate, Priscilla, had taken and edited some demo videos by Richard, please refer here for the demo videos.  

  • Pipe 5 patterns using Wilton open star tip # 22 (I used #20 which is smaller). Basically the technique can be applied to all open star tips.

Photo credit to fatmumbaking

  • Fold piping bag using tracing paper.

  • Proper way of holding a piping bag. My habit is to use both hands to hold the piping bag but Richard taught us to hold by one hand and use only the index finger of the other hand to act as stopper to stop the bag from swinging while you pipe. Do not fill in too much whipped cream at one time. Fold the bag opening inwards and your hand should be holding the end of the bag.

  • Remedy to overly dry whipped cream.


So here is my ugly cake from the class (pardon me for the poor quality pictures). When D first saw my cake, he described it as “pimples cake” which I agreed.

Since this was the first class, I went to the class without any idea. I didn’t plan and think of how to decorate the cake. Basically I just tried to pipe the patterns I learnt from the class on the cake.

 
As you can see from the picture the cream is not so smooth because the cream is too dry (and of course also due to my “skill”). When the cream is too dry, it is difficult to spread and there will be little holes on cream after spreading. I learnt that not only over beating will make the cream too dry, leaving whipped cream for too long time will cause the cream to turn dry too. Richard taught us the remedy that was to add little bit whipping cream (liquid form) to the whipped cream and mix well (need not whip again). If no more whipping cream, milk will be a good substitute. If not, water can also be used.

Cross section of the cake – sandwiched with whipped cream and blueberry fillings (thanks to my classmate for sharing the blueberry fillings with me).


For the sponge cake I followed the sponge cake recipe in this post, replaced pandan paste with vanilla extract and added 1 tsp of condensed milk. I didn’t do a good job as the cake was quite short. I brought the whole cake to my mother-in-law’s place right after the class for a family gathering. The cake was well-received. I think the cake tasted quite good with compliment of the condensed milk.

I enjoy the class a lot and like the way Richard conduct the class and interact with us. He is very generous in sharing his knowledge and experiences with us. Besides, all the classmates are very friendly and helpful. I really look forward to the coming 7 lessons.

Saturday, April 6, 2013

Cook.Bake.Love 四岁了。小送礼 4th Blog Anniversary & Little Giveaway


4年,1460天 ,479封贴,没有一定的坚持,没有你们的参与和支持,Cook.Bake.Love不可能走到今天。

这里不只有我的喜怒哀乐,还有许多我的第一次。。。我的第一个鲜奶油蛋糕,我的第一个翻糖蛋糕,我的第一个慕斯蛋糕,我的第一个面包,我的第一个传统月饼,我的第一个蛋挞,我的第一片糖霜饼干,我的第一勺自制雪糕,我的第一杯自制豆奶。。。当然少不了上图中的第一个figuring cake。

我想趁这个机会送出去年台湾行特别为Cook.Bake.Love读者们带回来的小礼物一表心意。


Cook.Bake.Love turns 4 today! Without your participation and support I don’t think this blog will be running until today.

To show my appreciation, I would like to have a little giveaway for all Cook.Bake.Love’s readers. The gifts were specially brought back from my Taiwan trip last year.


送礼详情 Giveaway Detail


礼物(1): 围裙 + 一份神秘礼物

Gift (1): Apron + one mystery gift


礼物(2): 《好吃不发胖低卡甜点》+ 一份神秘礼物

Gift (2): A non-fat/ non-butter recipe book《好吃不发胖低卡甜点》(Note: this book is written in Chinese) + one mystery gift


如何参加?
  • 这个送礼活动开放给所有读者,不管你来自什么国家。
  • 只需留言并注明你选择的礼物(礼物1或2)。
  • 如果你只想留言并不想参加送礼活动,请在留言里特别注明。
  • “关注”(Follow)Cook.Bake.Love将获得再多一个抽奖机会。请在留言里注明如果你已经关注了Cook.Bake.Love。
  • 以匿名方式留言的读者一定要在留言里写下的名字,不然留言将作废。
  • 送礼活动今天开始,截止日期为2013年4月14日

How to join?

  • This Giveaway is open to worldwide readers.
  • Just leave a comment in this post and mention your preference of gift (gift 1 or 2).
  • If you would like to leave comment but do not want to take part in the Giveaway, please mention in your comment.
  • “Follow” Cook.Bake.Love to get an extra entry. Please mention in your comment if you are follower of Cook.Bake.Love.
  • Anonymous must leave your name at the end of your comment. Else, the entry will be considered invalid.
  • This Giveaway starts from today and ends on 14th Apr 2013.

Wednesday, April 3, 2013

Lucius 三岁生日蛋糕 Part 2: Chocolate Cupcake with DIY Cupcake Topper


25 Feb 2013

今年宝贝的生日落在星期一,我拿了假准备带他到学校和老师同学们一起庆祝生日。本来想星期天一整天可以好好准备他的生日蛋糕和送给小朋友的礼物,谁知突然间需要当陪游,出门一整天到晚上11点才到家。当时已经是累到。。。但没办法还是得硬着头皮做蛋糕。还好我原本也只是想做简单的杯子蛋糕。

选了周老师的巧克力杯子蛋糕食谱。周老师用全蛋打发法但是多加一颗蛋黄,比例是两颗全蛋,一颗蛋黄。多加蛋黄有助于全蛋的打发,面糊也比较稳定。